Home equipment purchasing climbed among the top fitness priorities of 2026, with CivicScience tracking it as one of the year’s defining wellness trends. ACSM’s annual fitness trends report reinforced that shift, listing home-based training as a consistent priority for fitness consumers. What researchers and fitness data both show is the same thing trainers have known for years: people who build a home gym are more likely to actually train than people who rely on gym memberships.
The sticking point isn’t the equipment — it’s the programming. Most beginners buy dumbbells, maybe a pull-up bar, and then follow random YouTube workouts for two weeks before losing momentum. There’s nothing wrong with the intent. The problem is the absence of a structured plan with clear phases, measurable progress, and a defined finish line.
This guide covers exactly that: a 90-day training framework structured into three distinct phases, with specific workouts for each phase, clear criteria for progressing between phases, and the minimal equipment that makes it work without a full commercial gym setup.
Why 90 Days?
Ninety days is the minimum viable block for a beginner to see meaningful, measurable strength development. The first 30 days are neuromuscular — your brain is learning to recruit muscle fibers efficiently, which produces strength gains without significant muscle mass changes. The second 30 days are when actual hypertrophy begins. The final 30 days consolidate those gains and introduce the intensity techniques that carry you into intermediate training.
Shorter programs (30 days) don’t give the body time to fully adapt. Longer programs without phase breaks tend to blur into inconsistency. Ninety days maps cleanly onto a training quarter, and it’s a long enough window that progress becomes visible in the mirror and measurable in the logbook.
The three phases also solve a beginner’s biggest problem: knowing what to do next. Each phase has a defined focus, a defined end point, and a clear transition into the next phase.
What You Need Before You Start
Three things: a training log, a consistent training schedule, and the ability to measure your own effort.
Training log: Write down every set, every rep, and every weight you use. This isn’t optional. Without a log, you can’t verify progress, and without verified progress, you can’t make informed decisions about when to increase load or change programming. A spiral notebook works. An app works. A shared Google Sheet works. What doesn’t work is relying on memory.
Schedule: Three days per week is the optimal starting frequency for beginners. Days 1 and 3 with a rest day between, Day 2 off, Day 3, rest. Something like Monday/Wednesday/Friday or Tuesday/Thursday/Saturday. Four days is manageable if recovery is solid. Two days produces slower results but beats zero. Consistency over 90 days matters more than the exact schedule.
Effort measurement: Learn to use RPE (Rate of Perceived Exertion) on a 1–10 scale. RPE 7 means the set was challenging but form remained clean. RPE 8 is where form starts to require attention. RPE 9 means one more rep was possible. RPE 10 is maximal effort. Most of your sets in Phase 1 should feel like RPE 6–7. Phase 3 regularly hits RPE 8–9. If you’re never hitting RPE 7+, you’re not training hard enough to produce adaptation.
Phase 1: Foundation (Days 1–30)
Goal: Learn movement patterns, build a baseline of work capacity, and establish the training habit.
Phase 1 is not about intensity. It’s about competency. Every major movement pattern — push, pull, hinge, squat, carry — needs to be ingrained before load increases become productive. A beginner who adds weight before mastering the movement pattern just gets better at a flawed pattern.
Training frequency: 3 days per week Sets per exercise: 2–3 sets Reps: 10–15 per set Rest between sets: 90 seconds RPE target: 5–7
Phase 1 Full-Body Workout (3x per week)
Warm-Up (5–7 minutes)
- 10 arm circles each direction
- 10 hip circles each direction
- 10 bodyweight squats
- 15 banded pull-aparts (use the lightest resistance band)
- 12 band pull-downs (attach band to pull-up bar, simulate lat engagement)
Workout
| Exercise | Sets | Reps | Notes |
|---|---|---|---|
| Goblet Squat (dumbbell) | 3 | 12 | Hold at chest height, full depth |
| Dumbbell Romanian Deadlift | 3 | 12 | Hinge at hip, neutral spine |
| Dumbbell Floor Press | 3 | 12 | Press from lying on floor |
| Dumbbell Bent-Over Row | 3 | 12 each side | Single arm, brace against knee |
| Banded Pull-Apart | 2 | 15 | Rear delt and upper back activation |
| Banded Pallof Press | 2 | 12 each side | Core anti-rotation |
Starting weight: Choose a weight you can complete all reps with at RPE 6. This will feel light. That’s intentional — Phase 1 is about technique repetitions, not maximum effort.
Phase 1 progression rule: When you can complete all sets at the top of the rep range (15 reps per set) at RPE 6–7, add the next increment (2.5 lbs with PowerBlock) in the following session. Do not add weight until you’ve earned it with clean form at the top of the range.
End of Phase 1 benchmark: You should be squatting and hinging with a flat back consistently, pressing with full shoulder stability, and rowing without shrugging the weight up with your traps. If you’re not confident in one of these, spend an extra week on Phase 1 before progressing.
Phase 2: Build (Days 31–60)
Goal: Increase training volume, introduce compound loading, and build real muscle mass.
Phase 2 shifts the training stimulus from learning to accumulation. Volume — the total amount of work done — is the primary driver of hypertrophy in this phase. More sets, more exercises, slightly more intensity.
Training frequency: 3–4 days per week Sets per exercise: 3–4 sets Reps: 8–12 per set Rest between sets: 2 minutes for compound lifts, 90 seconds for accessory work RPE target: 7–8
Phase 2 introduces an upper/lower split for 4-day weeks, or continues full-body training for 3-day weeks. The upper/lower split allows more volume per muscle group per session without extending each workout beyond 45–55 minutes.
Phase 2A: Upper Body Day
| Exercise | Sets | Reps | Notes |
|---|---|---|---|
| Dumbbell Bench Press (floor or bench) | 4 | 8–10 | Full range, control the descent |
| Dumbbell Row | 4 | 8–10 each | Brace core, lead with elbow |
| Dumbbell Shoulder Press | 3 | 10–12 | Seated or standing |
| Pull-Up or Band-Assisted Pull-Up | 3 | Max or 6–8 | Use band for assistance if needed |
| Dumbbell Curl | 3 | 12 | Controlled eccentric |
| Tricep Dumbbell Extension | 3 | 12 | Overhead or lying |
Phase 2B: Lower Body Day
| Exercise | Sets | Reps | Notes |
|---|---|---|---|
| Dumbbell Goblet Squat | 4 | 10–12 | Heavier than Phase 1 |
| Dumbbell Romanian Deadlift | 4 | 10–12 | Increase load systematically |
| Dumbbell Split Squat | 3 | 10 each side | Front foot elevated adds range |
| Dumbbell Hip Thrust | 3 | 12 | Upper back on bench or couch |
| Calf Raise | 3 | 15–20 | Slow eccentric |
| Plank | 3 | 30–45 sec | Keep hips neutral |
Phase 2 progression rule: Use double progression. Start each exercise at a weight where you can hit the bottom of the rep range (8 reps) at RPE 7. Progress reps each session until you reach the top of the range (12 reps) across all sets. Then increase load and drop back to 8 reps.
Pull-up progression: Most beginners can’t do a pull-up on day one. The WODFitters bands solve this directly — use the thickest band in the set to take most of your bodyweight off, then progress to thinner bands as strength develops. By Day 60, many beginners can do 3–5 unassisted reps after consistent band-assisted work.
End of Phase 2 benchmark: You should be completing 3–4 sets of 10 reps on your main lifts at meaningful weights — goblet squats with 40+ lbs, rows with 35+ lbs, shoulder press with 25–30 lbs. These numbers vary widely by individual; the benchmark is completing all reps at RPE 7–8, not a specific weight.
Phase 3: Strengthen (Days 61–90)
Goal: Develop maximum strength in foundational patterns and cement progressive overload habits that carry you forward indefinitely.
Phase 3 lowers rep ranges and increases intensity. This is where RPE 8–9 sets become standard, rest periods get longer, and single-rep and triple-rep sets appear for the first time. The neural adaptations from Phase 1 and the muscle mass from Phase 2 now have heavier loads applied to them — producing the strongest version of the beginner you’ll be at the 90-day mark.
Training frequency: 3–4 days per week Sets per compound lift: 4–5 sets Reps (main lifts): 4–6 Reps (accessory work): 8–12 Rest between compound sets: 3 minutes RPE target: 8–9
Phase 3: Upper/Lower Structure
Upper Day
| Exercise | Sets | Reps | Notes |
|---|---|---|---|
| Dumbbell Floor Press | 5 | 4–6 | Heaviest pressing you’ve done |
| Weighted Pull-Up or Max Reps | 4 | 4–6 or max | Add weight belt if doing 8+ unassisted |
| Dumbbell Bent-Over Row | 4 | 6–8 | Heavy, controlled form |
| Dumbbell Overhead Press | 3 | 6–8 | Standing |
| Facepull with Band | 3 | 12–15 | Loop band at eye height |
| Bicep/Tricep Superset | 3 | 10 each | Minimal rest between the pair |
Lower Day
| Exercise | Sets | Reps | Notes |
|---|---|---|---|
| Dumbbell Goblet Squat or Bulgarian Split Squat | 5 | 4–6 | Maximum load for the rep range |
| Dumbbell Romanian Deadlift | 5 | 5–6 | Heaviest session yet |
| Single-Leg Dumbbell Hip Thrust | 3 | 8 each | Advanced glute work |
| Dumbbell Step-Up | 3 | 10 each | Loaded carries build single-leg strength |
| Nordic Curl (feet under couch) | 3 | 3–5 negatives | Best hamstring exercise without a machine |
| Farmer Carry | 3 | 30 seconds | Walk with heaviest dumbbells |
Phase 3 progression rule: Use weight as the primary progression driver. Add the smallest available increment each session for each lift where you hit the top of the rep range. For the PowerBlock, that’s 2.5 lbs. At RPE 9, do not add weight — hold the load until RPE drops to 7–8 before advancing.
Essential Equipment for the First 90 Days
Three pieces of equipment cover every workout in this program. No barbell, no squat rack, no cable machine required.
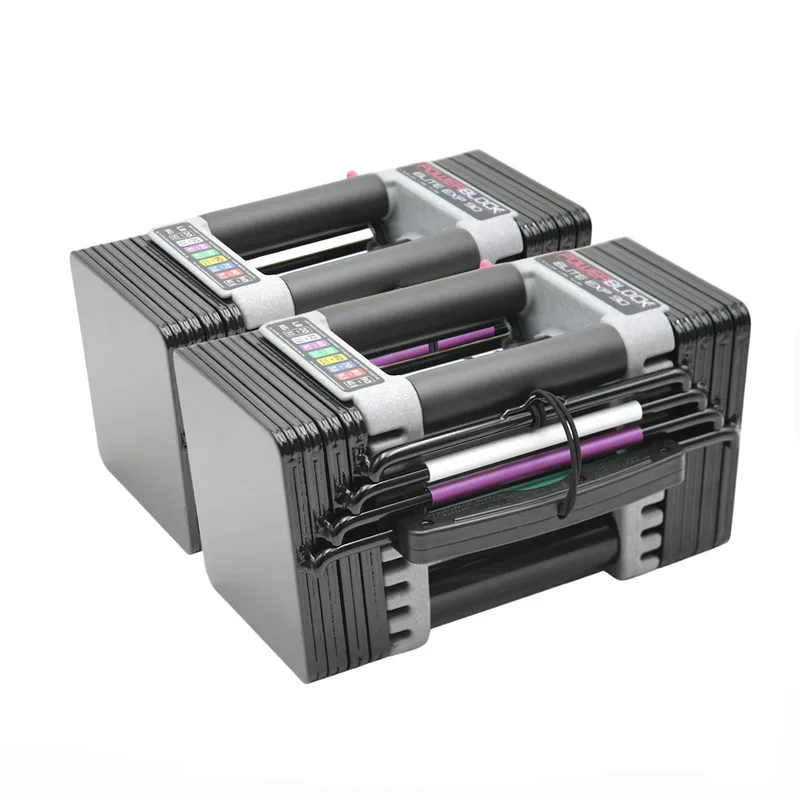
PowerBlock Elite EXP Stage 1
Pros
- Replaces 16 pairs of dumbbells in a footprint the size of two bricks
- 2.5 lb increments allow gradual progressive overload from week one
- Expandable to 70 or 90 lbs as your strength increases over time
- 10-year warranty is the best in class for adjustable dumbbells
Cons
- Higher upfront cost than a basic pair of fixed dumbbells
- Blocky shape makes certain exercises like renegade rows awkward
- Expansion kits sold separately add to the total investment
Adjustable dumbbells are the non-negotiable foundation of a dumbbell-based home gym. The PowerBlock Elite EXP Stage 1 covers 5 to 50 lbs per hand with 2.5 lb increments — which maps directly onto the progressive overload model built into this program. The compact design (roughly the footprint of two bricks per unit) fits any space, including apartments. The expandable design means this pair grows with you past 90 days — add the Stage 2 kit to reach 70 lbs, Stage 3 for 90 lbs. Based on owner reports across thousands of reviews, the selector mechanism holds up reliably under daily training loads. The 10-year warranty backs that durability claim.
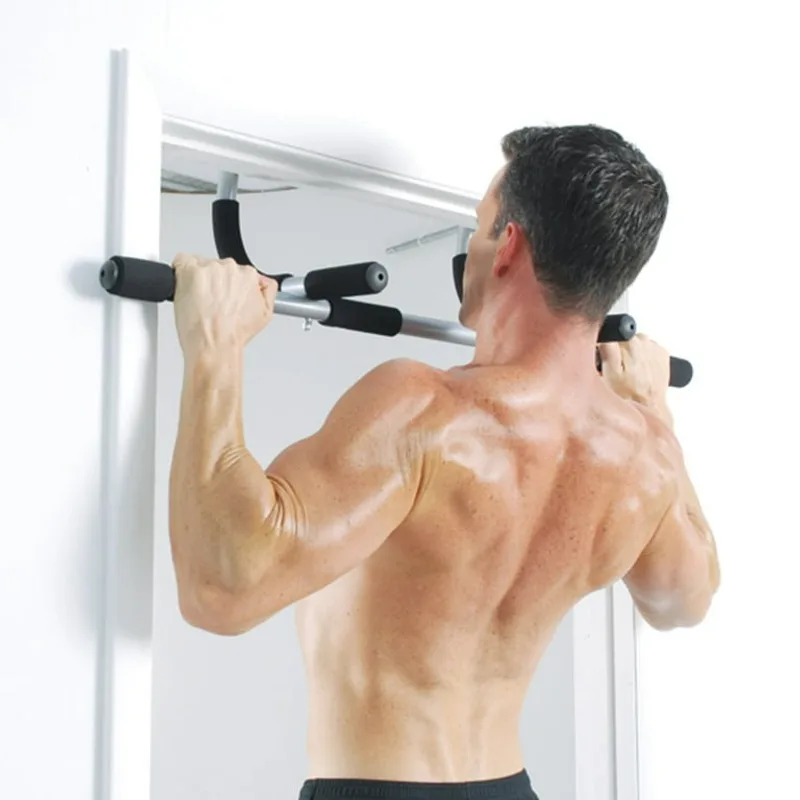
Iron Gym Total Upper Body Workout Bar
Pros
- No screws or drilling — installs and removes in seconds
- Three grip positions cover wide pull-ups, neutral chin-ups, and close pulls
- 300 lb weight capacity handles most lifters
- Doubles as a push-up and sit-up handle when placed on the floor
Cons
- Only fits 24–32 inch door frames — measure before ordering
- Some door molding styles won't accommodate this bar design
- Plastic door frame guards can mark painted trim over time
The pull-up is the single best upper body pulling exercise available without a cable machine. The Iron Gym bar requires no installation — it hooks over a standard door frame in seconds and stores flat when not in use. Three grip positions (wide, neutral, close) cover the full range of pulling mechanics: wide grip for lat development, neutral for brachialis and bicep work, close grip for chin-up strength. The bar also doubles as a push-up handle when placed on the floor, adding range of motion to a movement that’s otherwise limited by wrist flexibility. At $30, it’s the highest return-per-dollar purchase in home gym accessories.
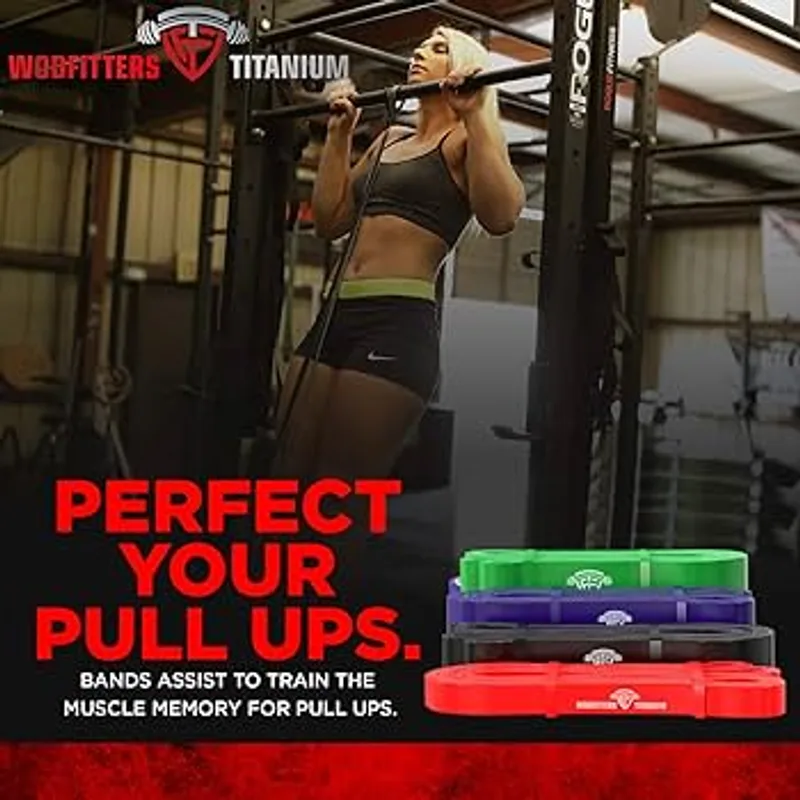
WODFitters Titanium 4-Band Set
Pros
- 4 progressive resistance levels let you scale pull-up assistance as you get stronger
- Safe Stretch Technology latex resists cracking and snapping under repeated load
- Covers every beginner need from mobility drills to banded compound movements
- Prime-eligible for fast delivery
Cons
- Individual bands can't be repurchased separately — the set replaces as a unit
- Latex construction is a risk for users with latex sensitivities
- Lightest band may not provide enough resistance for heavy banded squat work
Resistance bands serve three roles in this program: pull-up assistance during Phase 1 and Phase 2, warm-up and activation work before every session, and accessory exercises (band pull-aparts, facepulls, Pallof presses) that protect joints under load. The WODFitters Titanium set provides four resistance levels that let you scale pull-up assistance as strength develops — starting with the heaviest band and progressively moving to lighter bands as you get stronger. Owner reports on the Safe Stretch Technology latex are consistently positive on durability; this is one of the few band sets that survives daily use without cracking or premature snapping.
Quick Comparison: Essential Beginner Equipment
| PowerBlock Elite EXP | Iron Gym Pull-Up Bar | WODFitters Titanium Bands | |
|---|---|---|---|
| Price | $350 | $30 | $49 |
| Primary Use | All pressing, pulling, hinging exercises | Pull-ups, push-ups | Pull-up assistance, warm-up |
| Increments | 2.5 lbs | N/A | 4 levels |
| Space Required | 2 sq ft | Door frame | Hanging storage |
| Phase 1 Use | Every workout | Every workout | Warm-up + assistance |
| Phase 3 Use | Every workout | Pull-ups, weighted | Accessory work |
| Expandable | Yes (to 90 lbs) | No | No |
Buying Guide: Choosing Your First Home Gym Equipment
Adjustable dumbbells vs. fixed dumbbell set: A fixed set from 5 to 50 lbs costs $500–$900 and takes up 8–12 feet of floor space. A PowerBlock covers the same weight range in one square foot. For beginners who are still learning which weights they’ll use most, adjustable wins on every metric except grip feel during certain exercises.
Do you need a bench? The workouts above use the floor for pressing exercises, which limits the range of motion on chest press. A flat bench adds range of motion and enables incline work. It’s not required for the first 90 days — a couch or sturdy chair handles hip thrusts and some elevated push-up variations. Once you’ve finished Phase 3 and confirmed you’re going to keep training, a bench is the logical next purchase.
Do you need a barbell? No — not for the first 90 days. The barbell becomes relevant when dumbbell loads become impractical (carrying two 90-lb dumbbells for deadlifts is awkward). Most beginners won’t hit that ceiling in three months. Add a barbell and plates after the 90-day program when strength demands exceed dumbbell capacity.
Band quality matters: Budget bands sold in bulk on Amazon snap within a few weeks under daily use. The WODFitters Titanium set is one of the few options on Amazon with owner-reported durability that holds up to the claims. Cheap bands fail at the worst moments — stretched out under load during a pull-up attempt. Spend the premium once and avoid re-buying.
FAQ
How much strength can a beginner expect to gain in 90 days? Strength gains in the first 90 days are primarily neurological — your brain gets better at recruiting muscle fibers, which produces strength increases without proportional mass changes. Based on owner-reported results and standard strength development timelines, most beginners can expect to double or triple their starting weights on major exercises like goblet squat and bent-over row within the first three months. Upper body pressing tends to progress more slowly than lower body movements.
What if I miss days? Does the program restart? Missing a session or even a week doesn’t require restarting. Resume where you left off and reduce the load slightly on the first session back (about 10%) to account for detraining. Missing 2+ consecutive weeks may require an extra week at Phase 2 intensity before returning to Phase 3 loads. Consistency over 90 days matters more than perfection on any individual week.
Can I do this program with only dumbbells and no pull-up bar? Yes, with modifications. Replace pull-ups with dumbbell bent-over rows, dumbbell pullovers, and band pull-downs (attach the band to a door at the top and pull straight down). You’ll develop back and bicep strength without the vertical pulling mechanics that pull-ups develop, which are genuinely difficult to replicate with dumbbells alone. Add the pull-up bar as soon as budget allows — it’s the cheapest and highest-impact addition to a dumbbell-only setup.
How long should each workout take? Phase 1 workouts take 35–45 minutes. Phase 2 upper/lower sessions run 45–55 minutes. Phase 3 sessions can reach 55–65 minutes on heavy days with full 3-minute rest periods. Warm-up is included in those estimates. If sessions are routinely running past 70 minutes, you’re resting too long or adding too many sets.
What comes after the 90 days? After completing this program, you’re an intermediate beginner — you’ve developed real strength, established a training habit, and understand how to apply progressive overload. The logical next steps are adding a barbell and plates for lower-rep compound work, adding a bench for full pressing range, or transitioning to a 4-day upper/lower split with more volume per session. Our best Olympic barbells guide and best weight benches for home gyms cover those next purchases in detail.
Conclusion
The first 90 days of home gym training determine whether the equipment you buy becomes a long-term investment or an expensive coat rack. The difference is programming. Three structured phases — Foundation, Build, Strengthen — each with a clear focus and defined progression criteria, give every workout a purpose and every week a direction.
You don’t need a full commercial gym setup to train effectively. Three pieces of equipment cover every workout in this program: adjustable dumbbells for progressive resistance across all major movement patterns, a doorframe pull-up bar for upper body pulling, and resistance bands for assistance and accessory work.
Best adjustable dumbbell for beginners: PowerBlock Elite EXP Stage 1 — 2.5 lb increments and a 10-year warranty make it the most practical choice for 90 days and beyond.
Best budget add-on: Iron Gym Total Upper Body Workout Bar — $30 for pull-up access across three grip widths, no installation required.
Finish all three phases. Log every session. Increase load when you’ve earned it. That’s the entire formula.
For your next equipment investment after completing this program, see our best home gym packages under $1,000 and best squat racks for home gyms.