Home gym layout planning has changed in 2026. Owners are treating it less like “where does the rack go?” and more like a design project — with defined zones, intentional flow, and specific sight lines. That shift is visible in how home gyms now look: rubber-floored zones separated by function, mirrors placed for actual form feedback, and storage mounted on walls instead of piled in corners. Getting the layout right before you buy equipment saves money and prevents the most common garage gym problem — buying gear that technically fits but makes the space unusable.
This guide walks through every dimension, clearance, and placement decision you need to make before moving a single piece of equipment.
How Much Space Do You Actually Need?
The minimum functional home gym is smaller than most people think. You can train effectively in 100 square feet — about the size of a 10x10 room — if you choose space-efficient equipment. The issue isn’t always total square footage; it’s how that square footage is allocated.
Here are the realistic space requirements by setup type:
| Setup Type | Minimum Footprint | Comfortable Footprint |
|---|---|---|
| Dumbbells only (adjustable) | 8 x 8 ft (64 sq ft) | 10 x 10 ft (100 sq ft) |
| Barbell + plates (no rack) | 10 x 8 ft (80 sq ft) | 12 x 10 ft (120 sq ft) |
| Half rack + barbell + bench | 10 x 10 ft (100 sq ft) | 12 x 12 ft (144 sq ft) |
| Full power rack + bench + cardio | 12 x 12 ft (144 sq ft) | 15 x 15 ft (225 sq ft) |
| Full functional gym (rack + cardio + cable) | 15 x 15 ft (225 sq ft) | 20 x 20 ft (400 sq ft) |
These are floor footprint numbers — not counting wall storage. Mounting barbells, bands, and accessories on walls significantly extends what you can fit in a given square footage.
Key point: Measure your actual available space before buying anything. Include door swing clearance. Don’t measure to the wall — measure to where you can actually stand and move.
The 4-Zone Layout System
The most efficient home gyms divide the space into four zones before placing any equipment. This prevents the most common layout failure: treating the room as a single undifferentiated space and cramming equipment wherever it fits.
Zone 1: The Strength Zone Your rack, barbell, and bench go here. This zone needs the most clearance — at minimum 4 feet in front of the rack and 3 feet behind for loading. It also benefits most from a mirror on the facing wall. Place the strength zone first, because it has the most rigid spacing requirements.
Zone 2: The Cardio Zone Treadmills, bikes, rowers, and air bikes go here. Cardio equipment is directional — you face forward — so place it with the display facing a wall, a TV, or a window. Keep at least 3 feet behind treadmills and rowers for safety. Cardio machines generate more vibration than strength equipment, so they benefit from dedicated flooring.
Zone 3: The Movement Zone An open section for mobility work, stretching, bodyweight training, and warm-up. This zone often gets sacrificed first when space is tight. Don’t sacrifice it — even a 6x6 open patch makes a meaningful difference in how the gym functions daily. This is where your flooring investment matters most; it should be cushioned and completely clear.
Zone 4: The Storage Zone Wall-mounted barbell racks, plate trees, accessory hooks, and shelving. Keeping storage off the floor recovers 15–30 sq ft in a typical garage gym setup. Dedicate one wall entirely to storage instead of scattering it around the room.
Rubber Flooring: The Foundation of Your Layout
Flooring defines your zones visually and physically. It protects the subfloor, absorbs impact, and determines how equipment moves (or doesn’t) when loaded. You should install flooring before moving equipment in.
For most home gyms, 3/4” interlocking foam or rubber tiles are the right choice for general training zones. For a heavy deadlift zone, add a 3/4” plywood panel on top of the tiles as a lifting platform.
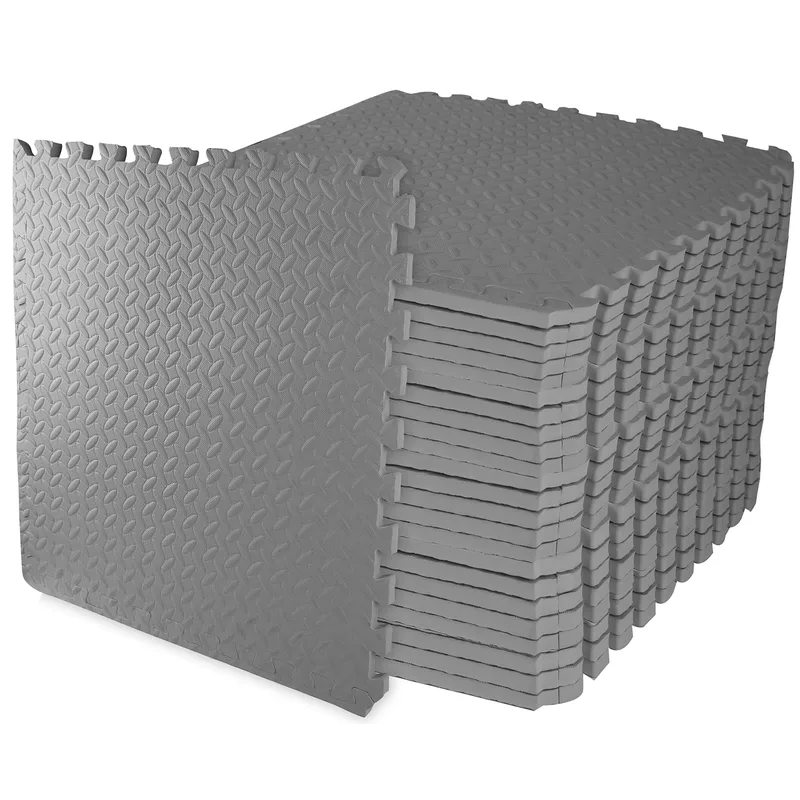
Signature Fitness 3/4" Interlocking Foam Tiles (96 sq ft)
Pros
- 96 sq ft set covers a full 10x10 ft training zone in one purchase
- Double-sided non-slip texture prevents slipping whether equipment sits on top or you're barefoot
- Interlocking edges stay tight under heavy foot traffic and loaded barbells
- 3/4" thickness absorbs impact from dropped plates better than thinner foam alternatives
- Lightweight tiles are easy to reconfigure when you change your layout
Cons
- EVA foam compresses over time under very heavy static loads (power racks, loaded barbells)
- Not suitable as a standalone deadlift platform — needs a plywood overlay for regular drops
- The interlocking borders that come included are easy to lose during reassembly
Coverage math: A 10x10 foot strength zone needs 100 sq ft of flooring. The 96 sq ft set above covers a 9.8x9.8 ft zone — close enough for most setups. Buy one extra bag for overage.
Layering flooring: For garage gyms on concrete, use 3/4” rubber horse stall mats for the main lifting zone (available at Tractor Supply for ~$50 each) and foam interlocking tiles for the movement/cardio zones. The transition between flooring types doubles as a zone divider.
Ceiling Height Requirements
Ceiling height is a hard constraint that many buyers overlook until they’ve already purchased equipment.
| Exercise | Minimum Ceiling Height |
|---|---|
| Standard pressing and squatting | 8 ft |
| Rack-mounted pull-ups (standard 90” rack) | 9 ft |
| Overhead press standing | 9 ft |
| Olympic weightlifting (clean & jerk, snatch) | 10–12 ft |
| Wall ball or medicine ball throws | 12+ ft |
Checking your rack: The rack’s height plus your height plus full arm extension equals the ceiling clearance you need for overhead press. A 7-foot tall person using an 84” rack needs about 10.5 feet of clearance for safe overhead work.
Most residential ceilings are 8–9 feet. If you’re working with 8-foot ceilings, buy a shorter rack (look for racks listed as “compact” or “low-ceiling” — typically 72–82” tall). Avoid tall A-frame racks in low-ceiling spaces.
Basement-specific note: HVAC ducts, lighting fixtures, and beam structures can reduce usable height in a basement. Measure the actual clearance in each zone, not just the raw ceiling height.
Equipment Spacing Rules
This is where most home gym layouts fail. Equipment that technically “fits” in the room doesn’t leave adequate working space around each piece.
| Equipment | Front Clearance | Side Clearance | Rear Clearance |
|---|---|---|---|
| Power rack / squat rack | 4 ft | 2 ft each side | 3 ft |
| Flat/adjustable bench | 3 ft (foot end) | 2 ft each side | 2 ft |
| Treadmill | 6 ft (rear safety zone) | 1.5 ft each side | — |
| Rowing machine | 3 ft (front) | 2 ft each side | — |
| Air/exercise bike | 2 ft (front) | 1.5 ft each side | 1.5 ft |
| Cable machine | 3 ft (cable path) | 2 ft each side | 2 ft |
| Deadlift zone | 1.5 ft each end | — | — |
Practical tip: Use painter’s tape on the floor to mock up your layout before moving equipment. Tape out every piece at its full footprint including the clearance zones around it. Walk around. Simulate loading the barbell. Simulate walking between the rack and the cardio machine. You’ll find problems with paper tape that would be expensive to discover with actual equipment.
Mirror Placement
Mirrors serve two functions in a home gym: form feedback and spatial amplification. Poor placement serves neither.
For form feedback: The mirror must face you at the lifting station. For squats, deadlifts, and pressing, that means the mirror is on the wall you face during the movement. For a rack setup, this is typically the wall the barbell faces — the front wall.
Sizing: At minimum, cover the width of your lifting station (the rack width plus 18” on each side) from floor level to eye level when standing. For a standard rack at 48” wide, that’s 84” of mirror width minimum. Two 48”-wide panels cover this with overlap to spare.
Mounting height: The bottom edge of the mirror should be 12–18 inches from the floor. Lower mounting captures loaded barbell position; higher mounting loses the information you actually need. Mirrors mounted above 24” from the floor are almost useless for form feedback.
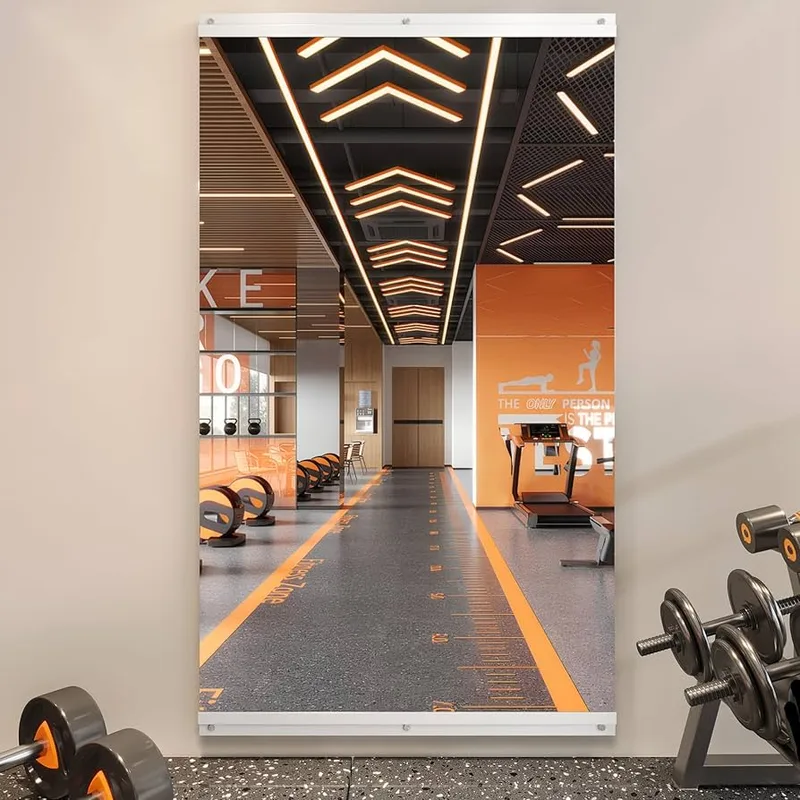
ROOMTEC Frameless Wall Mirror 48"x24" (2-Pack)
Pros
- Tempered glass with explosion-proof film is safer than standard mirrors if they break
- 5mm thickness provides clear, distortion-free reflection that standard bathroom mirrors cannot match
- Two-panel design is far easier to ship and install than a single large piece
- Aluminum J-bar mounting system is genuinely secure and low-profile
- Can be configured side-by-side or stacked for different wall dimensions
Cons
- 48" width per panel is narrower than commercial gym mirrors — you'll want two sets for a full rack wall
- Installation requires a drill, level, and stud finder — not a five-minute hang
- Tempered glass still shatters into pieces if struck by a barbell or heavy plate
Safety consideration: Mount gym mirrors to studs, not drywall anchors. Tempered glass mirrors are safer than standard glass (they shatter into smaller, less sharp pieces), but no mirror should fall. Keep mirrors out of direct barbell-throw paths. The ROOMTEC 2-pack above covers 96” x 24” side-by-side — enough for a full rack wall at standard mounting heights when stacked or arranged horizontally.
Storage: Getting Equipment Off the Floor
Wall storage is the highest-ROI layout change in a home gym. Moving barbells, plates, and accessories off the floor recovers significant square footage and eliminates the tripping hazard that makes narrow gyms unusable.
The three highest-priority storage decisions:
1. Barbell wall mounts. Horizontal wall-mounted brackets hold 3–6 barbells flat against the wall. One pair of brackets takes up zero floor space. Without them, barbells lean in corners, roll, or get stacked on J-cups where they scratch and interfere with rack use.
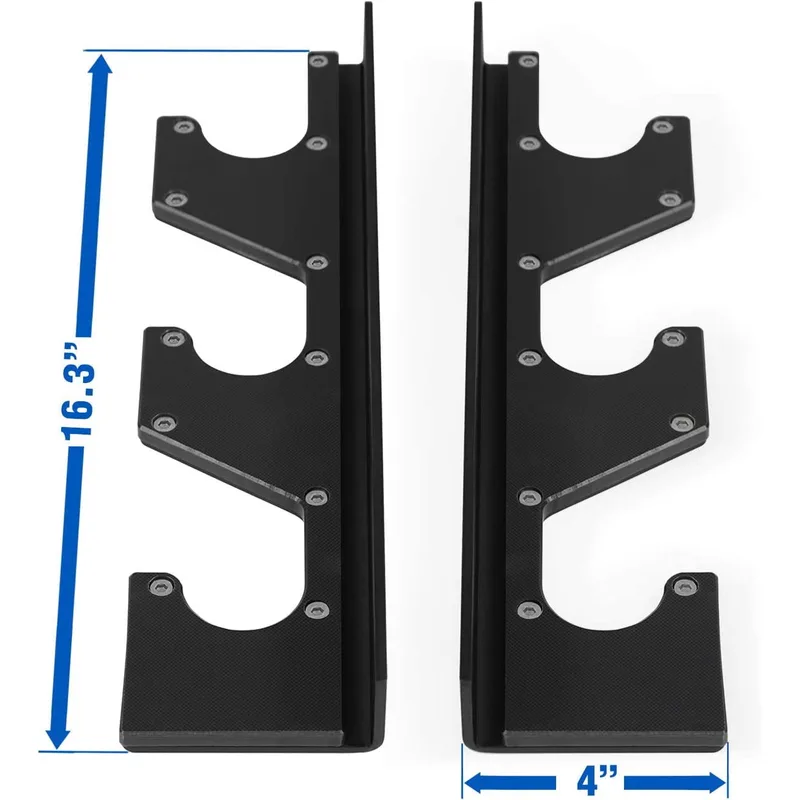
Yes4All Horizontal Wall Mounted Barbell Rack (Pair)
Pros
- Mounts barbells horizontally on the wall, freeing up 14+ sq ft of floor space
- 7-gauge steel construction holds full-size Olympic barbells without flex or sag
- Foam-lined cradles prevent sleeve scratches and keep bars from rolling
- Low-profile design stays tight to the wall and doesn't interrupt gym flow
- One of the most affordable storage solutions that actually works under load
Cons
- Requires solid stud mounting — drywall anchors alone are not sufficient for loaded bars
- Does not work well for specialty bars longer than 86" unless mounted with extra clearance
- The pair holds 3 bars; serious collectors may need a second pair
2. Plate storage. A vertical plate tree or wall-mounted peg system keeps plates from stacking on the floor around the rack. A loaded 45-lb plate standing upright against a wall is a fall hazard. Dedicated storage prevents this and makes loading barbells faster.
3. Accessory hooks. Resistance bands, straps, chalk bags, jump ropes, and foam rollers consume more visual space than they deserve. A simple pegboard or set of wall hooks ($15–$30) keeps these off the floor and out of the movement zone.
Storage placement rule: Keep all storage within 10 feet of the equipment it serves. Plate storage belongs directly next to the rack. Accessory storage belongs near the movement zone. Cardio accessories (towels, water bottle holders) belong near the cardio zone.
Common Layout Mistakes
Mistake 1: Placing the rack first, then fitting everything else around it. The rack placement should be determined by the mirror wall, the barbell loading direction, and the available front clearance — not by where the equipment delivery crew set it down.
Mistake 2: Ignoring door and window locations. Equipment placed in front of a door makes the gym inaccessible for loading large items. Equipment in front of a window blocks natural light and air circulation. Map these first.
Mistake 3: Underestimating the footprint of equipment with accessories. A rack listed at 48” x 24” is that size at the uprights — but with spotter arms extended and a barbell loaded, the functional footprint is 48” x 80”+ in the loading direction.
Mistake 4: No movement zone. Skipping the open floor area feels smart when space is limited. It’s not. A gym with no open floor becomes a maze that discourages use. Even 6x8 feet of open space significantly improves daily usability.
Mistake 5: Inadequate lighting in the zone you actually use. Bad lighting in the strength zone makes it hard to read the barbell’s position relative to the rack safeties. Bad lighting in the cardio zone makes machines harder to read and the space feel depressing. Plan lighting by zone, not by room.
Buying Guide: What to Finalize Before Purchasing Equipment
Before placing any equipment order, confirm these decisions:
- Total usable floor space (measure to where you can actually stand, not just to the walls)
- Ceiling height in each zone (rack zone especially)
- Which wall gets the mirror (determines rack orientation)
- Power outlet locations (treadmills, bikes, TVs need power where they go)
- Door swing clearance (doors open into gym space in most rooms)
- Flooring plan (install before moving equipment in)
- Storage wall (dedicate one wall to vertical storage before filling it with anything else)
Layout decisions are much cheaper to change on paper than with 400 lbs of steel already on the floor.
FAQ
How much space does a power rack need? Plan for the rack’s listed footprint plus 4 feet in front, 3 feet behind, and 2 feet on each side for safe use. A rack listed at 48” x 24” needs a minimum 10’ x 8’ zone with a loaded barbell. For comfortable training with a spotter, plan for 12’ x 10’.
Can I build a home gym in a 10x10 room? Yes, with the right equipment choices. A 10x10 room (100 sq ft) supports a half rack, adjustable bench, and barbell setup — but not much else. You’ll need wall-mounted barbell storage, a folding or low-footprint bench, and no dedicated cardio equipment. Full power racks need more than 100 sq ft to use safely.
What ceiling height do I need for a squat rack? For a standard residential power rack (84–90” tall), you need at least 9 feet of clearance for rack-mounted pull-ups and overhead pressing. If your ceiling is 8 feet or under, look for compact racks in the 72–82” height range. Always measure the rack’s pull-up bar height before purchasing.
Should I put flooring down before or after moving equipment in? Always before. Flooring that needs to go under a 500+ lb power rack is effectively impossible to install after the fact. Lay flooring, then assemble and position equipment on top of it.
How do I plan a layout without moving heavy equipment around? Use painter’s tape on the floor before you buy or move anything. Tape out every equipment footprint plus its required clearance zones at full scale. Walk through the marked layout and simulate every exercise you plan to do. This costs $5 in tape and catches every layout problem before it costs time and effort.
Conclusion
The single most important decision in home gym layout planning is zone allocation — deciding where each category of activity happens before placing any individual piece of equipment. Start with rubber flooring to define those zones, mount your mirrors to the wall your rack faces, and move storage off the floor entirely. Painter’s tape costs nothing and catches expensive mistakes. Measure ceiling height in every zone before ordering any rack taller than 80”.
The best home gym layout is the one you actually use — which means clear zones, no tripping hazards, and enough open floor to warm up without rearranging furniture.
For equipment recommendations by zone, see our complete home gym setup guide under $1,500 and our garage gym build guide.